VIDEO PRODUCTION TIPS
Double Your Editing Speed
Regardless of the tools we have to work with, the footage we’ve been given or who is looking over our shoulder, every editor has to do battle with time on every single project.
The world of video editing is no stranger to the appeal of drag and drop functionality. One might think that such ease of use would lead to greater efficiency, but a trigger-happy mouse finger isn’t always the quickest way to get things done. Many novice editors are first taught how to edit videos by dragging clips around the timeline, pulling the ends of clips forward and back, and plunking down one clip on top of another. It works but it’s not the most efficient method. The secret to speed editing is in the tools. The names of the tools may change in different editing programs but their functions remain the same. An editor who knows how to immediately access all of their tools is able to move swiftly through their edits and spend more time making creative decisions as opposed to technical tasks and perfunctory operations.
The Power of the Keyboard
One of the most powerful, and overlooked tools, is the keyboard. Professional editing applications offer up a slew of keyboard shortcuts, allowing the user to access any tool in the application with a keystroke. By putting keyboard shortcuts to memory through frequent use, the editor is able to move through edits at blazing speeds. There is a catch, keyboard shortcuts don’t help without the knowledge of what the tools are and what they do. Across the span of editing platforms out there, the keyboard shortcuts will vary from system to system but the tools work in a similar fashion. Once you learn them, your life will get much easier. Trust us - lay off the mouse as much as possible. It'll kill your hand after several hours of editing!
Selection
Every editing program is going to have one or more selection tools. These allow the user to select a clip or group of clips to be acted upon, whether it’s moving the selection, making an adjustment, or applying an effect. The simplest is called the move or arrow tool. A single clip is selected by clicking on it. Multiple clips are selected by click-dragging a bounding box around or through clips, selecting a portion of the edit.
A track selection tool will select all clips on a particular track. It can be modified to select one or more tracks in one direction from where the cursor is placed. This is useful when the editor wants to bump down an edit and fit a clip into a particular track.

Trimming
Trimming is the precision cutting of one clip and placing it in context with the cut of another clip. Clips are easy to move around with selection tools and the same selection tools make it just as easy to drag the end of any clip to trim its in and out points. Most editing programs now have a trim window. When an edit point between two clips is selected, a trim window is called up with two images, one showing the last frame of the first clip while the other displays the first frame of the second clip. In this window the editor is able to trim, or adjust, the clips and view the frames on both sides of the edit point.
A powerful tool that confuses many new editors is the ripple edit tool. The ripple tool is used to adjust a single clip in the timeline. By placing the tool over the head or tail of a clip, the editor is able to adjust the length of that clip. What makes the ripple tool powerful is that as the edit point for the selected clip is adjusted, the other clips in the timeline move with that adjustment so a gap isn’t created and the adjusted clip doesn’t overlap existing clips in the edit. The entire edit is maintained with only the selected clip being adjusted.
Related to the ripple edit tool is the roll edit tool. The roll edit tool adjusts the edit point between two clips. When placed on an edit point, the roll edit tool is able to move that edit point backward or forward, provided there is sufficient overlapping footage between the two clips. The clips maintain the position in the timeline but the edit point changes to where the editor rolls it.
The slip edit tool works upon a single clip, maintaining its placement and duration in the timeline. The slip tool moves footage forward or back, within the context of its placement. The clip’s duration and the edit points in the timeline remain the same, but the in point and out point of the selected clip are adjusted simultaneously. If the placement of the footage in the timeline is a window, the slip tool moves that footage through the window.
Similar to the slip tool is the slide edit tool. The slide edit tool allows the editor to move a clip in either direction while maintaining its duration. The head and tail of the clip remain the same whereas the placement of the clip changes. While the clip’s location in the timeline slides in position, the adjoining clips in front and behind it are adjusted accordingly.
One of the most practical tools at the editor’s disposal is the blade or razor tool. True to its name, the blade tool cuts clips into separate pieces. It’s most helpful for trimming clips to a specific frame and for splitting a clip.

Moving Clips
Moving clips into and around the timeline is the foundation of any edit. It can be simple, such as the drag and drop of a clip with the move tool. Yet there are other ways to move clips that increase efficiency or serve a specific purpose. There is the universal cut, copy and paste. This can be done with a single clip or with numerous selected clips.
When moving individual files from a media bin to the timeline, an editor chooses how the file will be placed. Common across editing platforms are the abilities to overwrite and to insert an edit. Overwrite places the clip at the selected point in the timeline, overwriting what is there without moving other clips in the edit. An insert places the clip at the selected point and ripples, or pushes further down, any clips that come after the insertion point.
Removing clips from the timeline also serves the editor with multiple choices. An editor can lift a clip, or delete it from the timeline, without changing anything else within the edit. Or, an editor can perform a ripple delete, which lifts the selected clip and closes the gap in the edit by moving all of the content past that clip up to the point where the removed clip had started.
Playback
The best way to judge an edit is to view it. Moving quickly through the timeline to what needs to be observed will give the editor more time to make a judgement. A standard in editing software is the use of J, K, and L keys. The J key moves the playhead back (reverse) through the timeline. The K key stops the playhead. And the L key moves the playhead forward. These keys are more proficient when fully utilized to their potential. By tapping the J key or L key twice, the playhead will move at twice the normal speed, and with repetitive keystrokes of the same key the speed continues to increase. Likewise, the playhead can be slowed down. If editors hit the L key twice to move forward through the timeline at twice the normal playback speed, they can hit the J key to slow down one notch and have playback at normal speed.
Sometimes repeated viewings are needed, over and over again, to get the feel for an edit. That’s when looping playback comes in handy. The editor selects a segment of the timeline and sets the playback to loop. This way the playhead continuously replays the selected region until the editor chooses to stop it.
How Do You Double Your Speed?
Many inexperienced and new editors want to learn how to edit videos. As the old idiom goes, “practice, practice, practice.” By taking the time to learn all the tools available and how to access them, you will grow in ability. By putting that knowledge to work and utilizing these video editing techniques, you will find greatly increased efficiency and discover you have a lot more time to work through your creative options and achieve a better edit in the end.
Chris “Ace” Gates is an Emmy Award winning writer and editor.
Sidebar: Video Editing Keyboards
A helpful tool for an editor getting to learn a new editing platform is a video editing keyboard. These are keyboards that are made specifically for an individual editing program. The keys on the keyboard not only have the standard QWERTY characters but also have the symbols of the different tools from the application to show where the keyboard shortcuts are. Often times these keyboards have color coded keys to keep like functions and toolsets grouped together. A video editing keyboard is a simple way to learn how to navigate a new program and increase your editing speed.
- See more at: http://www.videomaker.com/article/15643-double-your-editing-speed
SPECIALTY LIGHTING FOR PEOPLE
Lighting people isn't a one-size-fits-all setup. From bald heads to people with glasses, each subject will have something to stump the production lighting powers.
All video shooting starts with light because without light your camera won't "see" anything. All video shoots end with post-production where you edit, tweak and package your polished video into something you hope to distribute to friends, perhaps through a social media site, your church or school. Or you may be shooting for clients or maybe the broadcast media.
Once you have distributed your hard work you hope your audience will appreciate it and give you lots of praise or better yet, help you earn royalties or creative fees. It's really simple, you capture what you see so your audience can see it too. So the last thing you want your audience to see is dull - or worse - unappealing video, to avoid making dull videos means you should shoot exciting subjects like ski jumping or fashion runway shows, right? That way everything you produce is exciting and everyone will want to see your work. Pretty simple huh? Simple - but not realistic.
In the real world we are frequently asked to shoot mundane subjects like an interview of the local janitorial supply salesperson or your friendly neighborhood dentist. Not that these people are boring. They may even have a compelling story to tell such as "where I was standing when the meteorite hit the church steeple" or "what the spaceship looked like when it finally landed after terrorizing the entire campground." Or, more realistically, "how a class of children used finger paint to create a mural that inspired future generations".
You probably aren't going to be that lucky though. More than likely your subject will discuss day to day events in a rather matter-of-fact conversation and the last thing they need is blown-out lighting to make them look silly while telling their story. The best way to avoid this is to gain an understanding of specialty lighting when it comes to lighting people and how to capitalize on the lighting you have at hand or supplement the existing light with some of your own.
Familiar But Difficult to Deal With
The two most difficult subjects to light are food and people. This is because we see both in our daily lives and we have become so accustomed to their presence that we take them for granted. Take the lighting you might see in a fine restaurant. It's probably contrasty and not very flattering for the food or your dining companion. Humans fill in the blanks when the lighting is contrasty - we make the food look delicious and our companion appear absolutely fabulous. We fix the lighting internally and we do it so well that we aren't even aware we're doing it. The problem is that our cameras don't fix the lighting, so videographers must take special care to recognize lighting problems before they become post-production problems.
Tame the Beast
The most difficult source of light to master is also the most readily available and that's the sun. It's harsh, hot, makes for high contrast and a host of other adjectives you may want to assign it. Difficult is my personal favorite because it never fails. It's always in the wrong place, and worse, it's impossible to move. The good thing is that it's plenty powerful and gives you more power than you can possibly hope to use. Since you can't move it, you must accommodate this beast and move yourself and your subject so that you can tame its harsh qualities and harness its gentle love.
The Bald Facts
A classic example of the universe messing with your lighting karma is to be assigned to shoot an interview of - how shall we put it? A follicle-challenged person in front of his wheat farm. Ouch! There's no place to hide. No trees. No buildings. Nothing, just you and the bald farmer! But the good news is he's a morning person and so are you, so you arranged the shoot to take place in the morning and all you had to do is place him in such a way as to not have the sun in his face or his head. Bam! Solution found. Shoot finished and you're off to the next assignment! Wait. What just happened here? That was too easy. Yes, it was.
Lighting bald heads can be difficult, but if you timed the shoot when the sun was low on the horizon you solved what could have been a difficult shoot by planning ahead and that's the secret to great lighting - planning ahead so you are in control of the situation. You used the sky - that great big sky - as your main light source and the sun was there for your enjoyment. You could have put the sun directly behind him and captured a dramatic morning scene or you could have put the sun far to his side and let it become your fill light. You did not have it in his face and more importantly, on his head where it would have created the dreaded "chrome on the dome" effect. Your main light was "that great big sky" and the bigger the light source the softer the light which gave pleasing soft light to his face and did not accentuate his bald head. (See sidebar "Lighting for Bald Heads Indoors.")
Four-Eyed Beast?
Another challenging situation is lighting people with glasses. This can be a real problem because as your subject looks around, the glasses may catch the light and create a flashing effect which can be distracting. As with most interview lighting setups you want to flatter your subject with soft lighting, but this can be problematic if they wear glasses because that large, soft, flattering light becomes a huge beacon for their gasses to catch and reflect back.
The larger the surface of your light, the easier it is for the glasses to find a glare. You can make the surface area smaller by moving it back or switching to a smaller soft-box but then you get harsh lighting and that won't flatter your subject. You can ask them to remove or tilt down their glasses and many times they will volunteer to do just that - but if they always wear glasses then you should leave them on and besides, you like to show off your lighting skills anyway. Lighting people with glasses is difficult, but not impossible.
So how do you hide your lights from becoming visible in the reflections of glasses? You put the lights up above the subject so the glasses won't reflect into the camera, instead they'll reflect onto the ground. The best way to see this in action is to watch the news. Many anchors wear glasses but you never see reflections because the studio is lit from above. If you try to light your subject from too high above you will probably get a zombie look in which their eyes are in deep shadows. The secrets here are numerous lights in a TV studio. Often a grid that spans the entire ceiling allowing one huge light source just like the sky in our farmer scenario. Additionally, these lights are already shifted to an effective point above the subject that will provide good lighting.
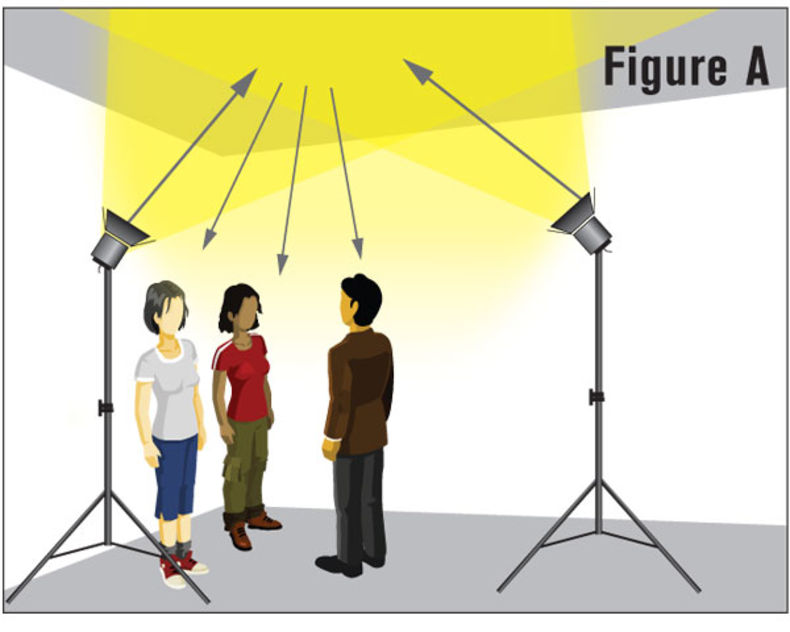
The first thing I do on an indoor shoot is bounce the light. I put one or more raw lights straight into the ceiling (Figure A) and fill the whole room with light. It's fast, easy, effective and almost guarantees great results. All you have to do is move the light around a bit until you get the desired results. Since I can't always hire assistant, I carry an extra light stand and put a white cloth with my own glasses on it so I can test the setup before my subject arrives. This is helpful because you want to sit everyone down and start shooting as soon as possible because if they are not comfortable in front of the camera, they will definitely be uncomfortable while you fiddle around with your lighting.
If you are in a room that has high ceilings then you must move to plan B which would be a large soft-box or scrim placed as close as possible to your subject. You are going to have to place it to one side so that it can't reflect into the glasses and give your subject harsh shadows opposite the light.
One solution (Figure B) for this is placing a reflector low and just in front of the subject. It has to be low enough so it won't reflect into the glasses but close enough to be effective. This will catch some of the spill from the scrim and bounce back into the set. You also might try a large reflector opposite the light where your subject is facing and place it about eye level, but make sure your subject does not face towards that soft-box during the interview.
Dark Complexion
Here's another situation you may encounter; lighting dark skin. This is where experience comes in handy because they may also be bald and wear glasses. You will have your work cut out for you but with a little tweaking and effort anything is possible and this is no exception.
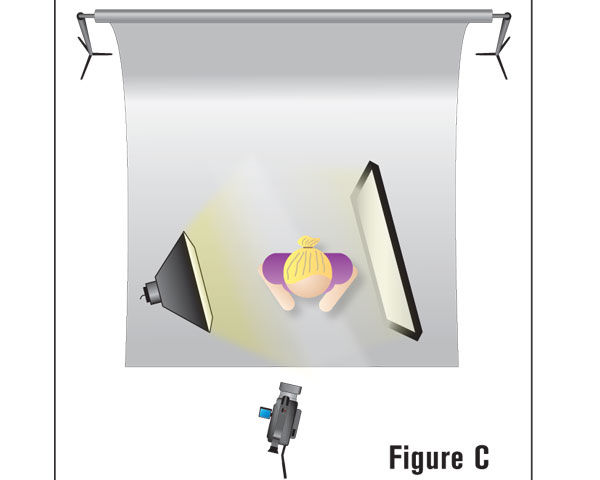
Start with a very large light source just like the example of lighting people with glasses then light the darker toned subjects just as you would people with glasses. This is exactly how I approach lighting when the subject has a dark complexion because if you light as you would a person with a light complexion you end up with speculars on their face! The trick here is to put the lighting on the sides of the face (Figure C) otherwise the speculars look like a 'T' pattern projected right down the center of the face starting with the forehead, running down the nose and chin. Yep, a perfectly symmetrical 'T' which isn't very flattering.
Avoiding this requires placing a large light source such as a 6-foot soft-box or scrim just to the side and a bit in front or your subject. You need a large light source to wrap the soft light around your subject. An extra large light source is needed not just for the soft shadows but to completely light all the surfaces of their skin. There is no substitute for large soft lights in this situation and any speculars from your lights can be very unflattering because they create odd lighting patterns such as the 'T' mentioned.
All the examples here use soft lighting because it provides a soft flattering quality that your subject will appreciate and also reduces reflections on darker skin. While it might require more time to set up, the forgiving nature of soft light reduces the chances of making mistakes on an assignment which improves the flow of your shoot and that gives you more time with your subject. This instills confidence in your subject because you are more relaxed and that gives you much better results than rushing around trying to fix a flawed lighting setup. Another consideration here is the shadow created by the light source. A broad light creates soft undefined shadows, whereas a sharp pinpoint light creates very harsh and well-defined shadows which projects the shadow of glasses frames on your subject's face and makes darker skin have great contrast which is not pleasant and difficult to fix in post.
It seems like a lot to consider, but you're becoming an expert in specialty lighting and such situations become just another day in the life of the production lighting designer - go forth and light, you've got the skills down.
Sidebar: Lighting Bald Heads Indoors
You can easily reproduce the lighting bald heads outdoors scenario by allowing the ambient light to be your fill light and balancing that with a large key light such as a 48-inch soft-box. Here is a great practice setup for you. If you have access to a bald person, great - otherwise a soccer ball will work. Get indoors where you have plenty of ambient light and set up your soft-box as a key light about two feet from your subject. From this distance it is really quite large and casts a nice wrap around light with soft but distinct shadows. The surface is bathed in soft light and the speculars are large enough to spread out over the surface. Now move it back a few feet and see the difference. Then remove the soft-box and take a look and see how the speculars really take over the lighting to create a chrome dome on the ball.
Terry O'Rourke specializes in retail advertising photography and videography for clients worldwide.
camera shots & tricks
AUDIO LOCATION SCOUTING
 Visuals aren’t the only thing to consider when you’re scouting locations. Audio is just as important. Just because a location looks good doesn’t mean it sounds good.
Here’s the scenario: You recently replied to an audio gig posted on craigslist. It’s set to shoot next Tuesday and the producers just hired you. In your email information packet, they list three locations and the addresses. One is indoors, one is an urban downtown setting and the last is on a wooded walking trail just outside of town. A quick look at Google Maps verifies the locations and now you’re wondering what challenges each will bring, and how to deliver the very best quality audio. You need to do a location scout, only this time it’s for audio.
Now we've talked about location scouting before, and when you're thinking video, you need to know what to expect. If a subject is going to be on-camera and you have a bad background, you have choices on how to fix it. But if you're gathering audio and the location is riddled with unwanted sound, you're rather stuck, so let's look at what to keep an eye (or rather, ear) out for.
The Indoor Shoot
The scheduled indoor location is the conference room of a local law firm. The first step is to call the law office, tell them who you are and ask very nicely if you can come by to check out the room ahead of the shoot. Be flexible with your schedule as law offices can be busy places. With your visit scheduled, you find some professional-looking clothes and get ready to head out the door. As you get in the car, you’re wondering if you should bring anything other than your eyes and ears.
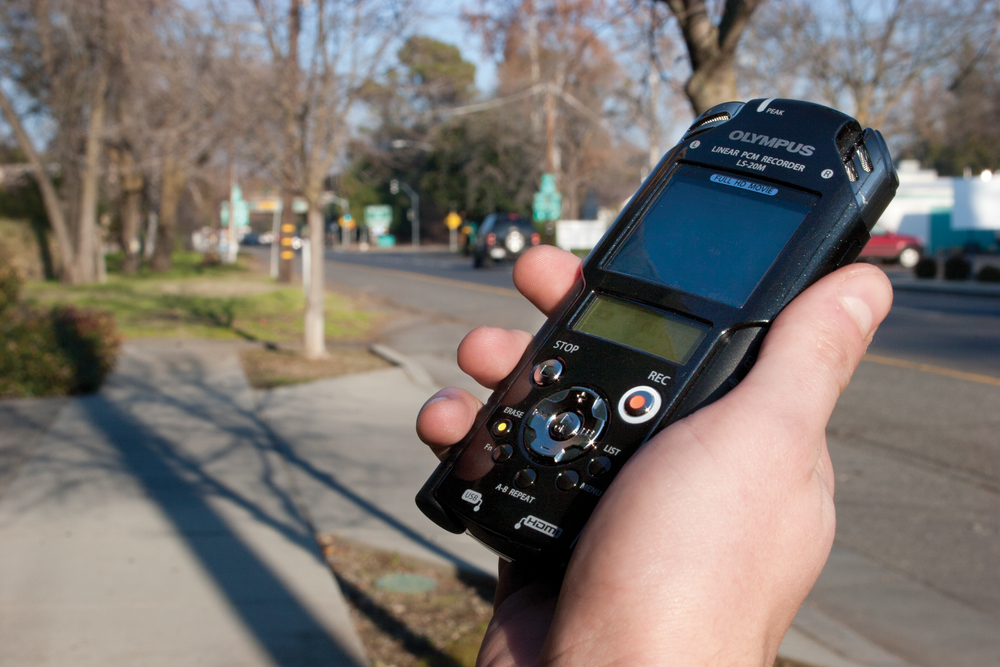
To be honest, your original equipment may be enough. A small pocket recorder and a pair of headphones is even better. And, while it would be nice to take your whole recording rig, it’s probably overkill for scouting locations. Once you’re in the room, what do you look and listen for? First, make note of the air conditioning system. It may be possible to shut it off if no one is working on the day of the shoot. Otherwise, assume it’s always on and listen for any loud noises, rattles and air whistling through vents. You might find a small refrigerator in the room. These little guys seem to kick on at the most inappropriate times. See if you can unplug it. Listen for background music systems and phones that ring in the room. Often, a background music system includes a volume control on a wall somewhere. Find it and make sure it works. As for phones, the simple solution is unplugging, but that might not sit well with the office manager. Ask the receptionist if the phone ever rings in the conference room and, if so, see if they can minimize that during the shoot.
Finally, observe the workplace. If the shoot occurs during business hours, make note of movements and conversations. Locate the break room and listen for how sound carries throughout the office complex. You can always ask people to keep it down, but they tend to forget. Also, visit the bathroom and run some water and flush the toilet. It’s not unusual for pipes to rattle or moan inside the walls and above the ceiling. Whether you find no problems or several, at least you won’t be surprised when you start recording audio, it's all about
planning in advance.
 Heading Downtown
The next stop is a small park in the middle of a busy downtown area. This time, bring your audio recording rig – including the microphones you plan to use on the shoot. In this type of environment, most of the audio irritations are beyond your control, so it’s a good idea to know the enemy beforehand. Since you know the time of the actual shoot, plan your location scout around that time to gauge normal traffic and other sounds.

While you may not know the exact park bench or area the director plans to shoot, you can get a feel of the location and everything that happens around it. Look for all kinds of traffic: automotive, wheeled and pedestrian. Check for alleys where big trucks could make deliveries or pick up garbage. Is there a fountain in the park? This can be a blessing or a curse. On the positive side, the fountain splash will be constant and always in the recording, masking some of the other noise and making editing easier later. On the other hand, you’ll have noisy audio no matter what you do. The only option is to minimize it as much as possible with creative
microphone positions.
Looking a little further out, are you near any emergency services or a hospital? If so, occasional sirens may be an issue as well as medical helicopters overhead. Speaking of overhead, is your location in the flight path of a nearby airport? The whine of jet engines is almost impossible to eliminate and, if it’s a busy airport, you can expect them all day.
Once you’ve done a visual inspection, it’s time for a
microphone test. Get your gear out, put on the headphones and hit the record button. As you listen, test microphone positions and locations to find the magic combination that provides the best audio. It’s helpful to have an assistant here. They can stand in for the talent and give you a real feel for the shoot sound. Save the recordings for later review. Now that you’re familiar with the downtown location, it’s time to head out to the walking trail.
Into the Wild
Away from the noise of the city, it’s fair to assume the walking trail will be easy to record, but will it? As you walk down the trail, the first thing you hear is the wildlife. All manner of bugs, birds and other critters calling to each other and rustling through the woods. Normally, this isn’t a big deal and actually lends to the authenticity of the setting. Of course, some areas are plagued by cicadas. When they’re in season – usually the warmer days of summer – the sound can be deafening. It will be extremely difficult, if not impossible, to remove a cicada song from your recordings, so beware.
Apart from nature sounds, you may hear other potential noises too. There may be farmland near your location which could introduce anything from cattle calls to machinery. Maybe there’s an outlying manufacturing facility in the distance. While some are virtually silent, others provide quite a racket – and at varying times of the day.
Finally, you can hear the same ground and air traffic noises that you’ll find in town. You might even hear a train or two. In the seclusion of the outdoor setting, these can seem especially loud and could pause your production several times during the shoot. As you’re recording audio, just be aware of them and make mental notes for later.
You’re the Scout
Location scouting is an important part of any production. Like many phases of video production, audio is often a last-minute consideration. As the audio recorder, be proactive and scout all the locations ahead of time. If the video crew is from out of town, you’ll be the on-set expert at each location and might provide some valuable insight. Regardless, you’ll definitely be better prepared to capture the best audio possible in each circumstance.
Sidebar:
Mapping the Shoot
We briefly mentioned Google Maps as a scouting tool, and we highly recommend that you spend some time with this idea. Whether you’re recording audio, video or both, online mapping tools are a great time saver. Google and Bing are the two biggest providers and both have their perks. With a standard map overhead view – called satellite view or bird's eye – you can see streets, businesses and wooded areas. It helps establish potential locations and easily points out possible hurdles like manufacturing facilities, trucking companies, hospitals and airports. For a more detailed look, try Google Street View. With this feature, you’re driving a virtual car down the streets of the city. If your area is supported, you’ll get a much better feel for the surroundings of possible locations – all from the comfort of home.
What to Pack
Feature filmmakers often do location scouts with a DSLR. Rather than bring the whole crew and a truckload of gear, with one simple tool, they can grab stills of a location from pretty much everywhere. In addition, it’s easy to shoot some basic footage from potential camera angles, giving the team a much better idea of what a location holds. You can approach audio location scouting the same way. Many times, rather than bringing your whole rig, a simple pocket recorder will do the trick. Recording samples around the scheduled shoot time gives you an honest assessment of the location and its audio challenges. In addition, your sample recordings could be used later in post-production to fill in some natural sound.
CAMERA SHOTS & TRICKS: DECEPTIVE ANGLES AND ZOLLY SHOOTING
How to shoot deceptive angles, including the zolly shooting technique and why you should include multiple different angles.
Camera tricks and shooting techniques can add to the magic of your videos along with some simple special effects. When combined these two forces become unmistakedly powerful. A very creative way to shoot an action sequence or lead up and build to an action sequence is by taking advantage of some of the more interesting camera angles and special effects that shake up the viewing experience for the audience.
One of these techniques is known as the Zolley. The Zolley adds a bit of drama by creating a disorienting visual experience for the viewer. By zooming out with the camera while using a dolly to move in the subject stands out as separated from the background and looks as if they are floating toward the camera.
This helped create many memorable scenes in such major motion pictures as Vertigo when Jimmy Stewart looks down the staircase and Goodfellas in the scene outside the café.
[Dialogue from Goodfellas, Male voice: “The booth near the window, so we could see everyone who drove up to the restaurant. We wanted to make sure I wasn’t tailed. He was jumpy. He hadn’t touched a thing. On the surface, of course, everything was supposed to be fine. We were supposed to be discussing my case but I had the feeling Jimmy was trying to sense whether I was gonna rat him out to save my neck.”]
The key here is that the dolly speed should be the same as the zoom speed. Otherwise, the effect doesn’t work.
Another important piece of the puzzle when shooting action is to be creative when capturing your scenes. Camera placement is only limited to your creativity. Using different angles will make your video more dynamic and dramatic. The more you deviate from the norm the more energetic the visual effect will become. Shooting from varying angles also enhances the illusion of depth in your videos. Remember a video is a two-dimensional representation of a three-dimensional world.
By placing your camcorder at different vantage points in three-dimensional space you help convince the viewer that a third dimension still exists in the flat pictures they’re watching. High angles offer useful perspectives over the heads of crowds but from a composition standpoint they’re great for making patterns within the image.
Low angles are, of course, the opposite, imparting feelings of dynamic engagement with the action. A nice camera trick using some of these elements would be the illusion of climbing a hill or mountain side. By using some deceptive shooting we can pull off this illusion. Sure, we can shoot someone actually doing it but we’re a tad bit lazy and we’d rather fake it.
The first step is going to be to set the stage for the audience and grab a few establishing shots so that they get lost within the setting. Utilize cutaways to help put a stamp on things and make sure to sell the illusion.
When shooting the climb cut to a different angle to show the resistance of the rope and be sure to have a grip pull anything hanging to add to the effect of gravity. A few key pointers are to wear tight clothes and to have someone pull on anything that can help solve the action. For instance, pull on the rope.
Camera angles can change the messages, ideas, and emotions behind your projects. Be creative and always give yourself plenty of options.
5 Reasons you Need More than Just a Camera
To be a true video producer, you need to carry more than just your camera. Although they are wonderful devices that can do amazing things, you can't make great video with just a camera - you should still have a few tools at your disposal when you need them, so we've compiled this list of five reasons you need more than just your camera. On every shoot you should always have:
1. A Plan: Because your camera can't create great production without a plan
Random shots aren't easy to edit into a project unless you always use a calendar-type compilation: "Sunday we went to the park, Monday we played with the dog, Thursday we got a few shots of the fresh fruits at the morning Farmer's Market... " Now tell me, how are you going to string all of those random 3 to 20 second shots into something usable? Shooting video isn't like shooting still photos. Every still photo should be able to stand on it's own. Video is a string of frames, and 90 frames (3 seconds) doesn't tell a story well. So always have a plan.
Even if it's a quick shot of the dog catching a ball, I have a habit of always shooting at least 20 seconds of three angles or shot types for editing later. A wide shot, medium shot and a close up, usually, but if possible, I try to get a shot of the subject moving into or out of the frame for clean edits. I also always get a cutaway - just in case. Old habits die hard!
2. A Stabling Tool: Because your camera can't get a clean stable shot by itself
I keep a cheap inexpensive tripod in the trunk of my car. Always. But I use a good tripod when it matters. I also keep a very tiny table-top device to attach to my camera or mobile phone in the trunk or a backpack - just in case. Handheld shooting is fine in many cases, but no serious shooter is going to make a stellar cinematic scene or inspire awe in their productions if the video is shaky, and small camera and DSLRs shake. If I'm trekking into the hills, I'll take the small tripod, or if I want to really be portable, I'll take a small table-top device , just in case. It won't help me make stellar pans or dolly shots, but for that one long distant shot where I'm zoomed all the way in to climbers on El Capitan in Yosemite, the stabilizer does the trick. Keep a tripod handy - always - and remember, the best tripod isn't any good if you don't use it.
3. An Audio Recorder or Mic: Because your camera can't record good audio from its own mic
Let's face it - camera mics have been maligned a lot over the years and, for the most part, they're not bad mics - they're just in the wrong place. Mics sit next to the camera lens, not to your subject, so unless your subject is 10 inches from the camera, your sound will be muddy, weak, and other noise around it gets picked up, too. For my hike in the forest example above, a small portable recorder can't be beat - you can place it on the forest floor, walk away 10 feet, and wait for the sounds of nature to resume around you after all creatures have acclimated to your presence. No camera mechanism noise, no videographer shuffling or breathing noise - just the world around you.
I also always keep a small inexpensive hard-wire lavaliere mic in my bag, just in case. The wire is long enough to get the mic away from the camera, and being wired it gives me a backup in case my wireless mic or recorder battery goes bad.
4. A Bounce Card, Reflector or Light: Because your camera can't control the light on its own
Nowadays many cameras cam do many things: they have GPS tracking, can fix color balance, have editing abilities and make digital effects on your just-shot clips. Heck, some cameras we shoot with can even make phone calls. (that's a joke, you know... I'm referring to mobile phones.) But one thing a camera can't do is control the light going into it well enough in every situation. You might not always need to set up a 3-point lighting scene, and you might not want a formal fussy shot or to lug along a lot of gear - but a small portable light can bail you out of a over-shadowed scene and a small bounce card can do wonders outdoors. A small collapsible reflector/diffusion disc is cheap, or you can take a piece of sturdy card stock, fold it two times to make it compact, and keep it in your pocket.
5. Some Cleaning Tools: Because your camera can't see through greasy fingerprints!
You're camera might have some self-cleaning mechanism inside it's innards, but it's up to its human handler to keep the outside of the camera clean. There are many good lens cleaning kits, but remember the most important is not to use anything that has alcohol as an ingredient. Whereas alcohol might not hurt the glass of your lens, it will help corrode the rubber linings and some plastic parts of the camera body. Keep a small lens cleaning cloth handy in the pocket of your gear bag, and clean it, too, once in a while. Many camera places give these away for free, and you can get them from an eye-glasses retailer, too. At the very least, keep a clean T-shirt on hand, if you have nothing - do not EVER use a paper towel [ouch! Scratchy!] or cotton puff or facial tissue. These puffs and tissues have particles on them that can work into your gear mechanism. Some baby wipes are good for wiping down the outside of your camera, but check the ingredients lists, first. And remember this: If you take nothing away from this story, learn this from me - I paid $500 getting my camera serviced because of some sort of debris that got into it - lesson learned!
These are just a few minimum tools to keep with you at all times if you want to be a serious shooter and be ready at a moment's notice. And all together, they don't weigh you down too much. You'll be happy you had these with you, and you'll be on your way to making great video using good tools.
- Jennifer O'Rourke, Videomaker's managing editor
Do-It Yourself Reflectors
Whether you're short a couple of lights, or just want to travel light, reflectors are a great way to achieve professional-looking lighting when working with limited resources. Reflectors can fit into any budget since they range from professional grade to do-it-yourself. Both are highly effective at lighting your subject and can be used in a number of lighting setups with great results.
If you're looking to save a few dollars, making your own light reflector is inexpensive and easy to do; all you need is a white foam-core board and some aluminum foil. You can use the white foam core board by itself for a soft reflected light or cover it with the aluminum foil for a more intense reflected light. If you desire a reflected light that falls between the two, try crumpling up the aluminum foil and then smoothing it back out before attaching it to the board. The bumps and ridges that result from the crumpling will help scatter the light, making it less intense than the smooth aluminum foil.
Using a foam core board as light reflector is a simple way to add highlights to your subject while filling in dark shadows. However, if you find this technique to be too much work or desire a more portable solution you can also use a reflective car window sunshade. Sunshades are relatively inexpensive, transport easily, and work great for reflecting light.
Whether you make your own light reflector or spend the additional money to acquire a professional one, having a reflector in your arsenal of lighting tools is priceless. By becoming familiar with light reflector techniques, you'll discover that it's really quite amazing how much a bit of bounced light can help you create that professional look.
Reflectors are inexpensive, but sometimes you need additional lights. Lights made for video production can be expensive and generally not sold in local stores. At Videomaker we know many of our readers need to acquire better lights on a budget. We have bundled these three eDocs "Lighting Technology", "Lighting Gels" and "One Light Wonder" because they are the most helpful to videographers who need to create better lighting on a tight budget.
Documentary Tip - Finding an Approach
Once you've settled on a topic for your documentary, the next step is to decide how you're going to approach it. There are a number of ways you can approach a single subject, and each approach will give your documentary a different feel. Taking a look at documentary genres and sub-genres, such as observational and participatory, can help you in determining how you want to approach your topic.
Observational documentaries follow a "fly-on-the-wall" approach. This technique focuses on observing the subjects in typical, everyday situations. As an observational documentarian, you're strictly there to capture what happens, without influencing the outcome in any way. Winged Migration is a great example of this approach.
A participatory approach is the exact opposite of an observational one. If you choose a participatory approach you are choosing to step out from behind the camera and actively participate in the documentary you're making. This approach can be found in documentaries like Bowling for Columbine and Where in the World Is Osama Bin Laden? The topic is explored through the director's experience and point-of-view, and focuses on persuading the viewer.
As a documentarian, you determine the viewer's experience. Your approach will significantly affect how your viewer perceives your documentary and the information presented to them. Finding an approach that best suits your storytelling goal and style will increase the impact that your documentary will have.
One of the most important decisions you will make is choosing which genre style to shoot your documentary in. The video "How 3 Types of the Documentary Genre Are Made" (from Videomaker's popular Documentary Production DVD) explores the observational, expository and participatory styles of documentary and will help you determine which is the best fit for your subject matter.
Color Correction
There are times when the color of the footage you have to edit is less than ideal. There are other times when it's downright bad. Fortunately, many editing applications have a color corrector tool that will turn discolored footage into well-matched, white balanced shots.
There are occasions when the footage that was captured turns out looking a bit on the blue side, and then there are occasions when it has a yellow tinge to it. This is a result of not properly setting your camera's white balance. However, there is no need to fret. There is a quick, and easy, way to fix this in post production.
Within your editing software there is a color correction tool. Upon opening the 3-way color corrector, you will find an eye-dropper beneath the mid color wheel. Click on the eye-dropper, then click on an item in the frame that should be white. By doing this you are telling the software that the selected item is white, and to match the rest of the shot according to that standard. Your color correcting tool will do the rest by white balancing the entire clip. You'll have to do this for each individual discolored clip, however, and if the color is still not balanced, you may have to manually adjust the color to your liking.
There are many techniques you can apply with the color corrector tool. You can simply color correct the shots that are not properly white balanced, or you can create color effects that will give your video an extra bit of flair. By learning how to use your editing software's color correcting tool, your videos will always look polished and professional.
Color correction is an essential skill every videographer needs to possess. By understanding how to color correct in post, you will be able to fix scenes in which the white balance is less than ideal. In our eDoc, Color Correction 101, we show you how to use a color corrector to fix poorly white balanced footage that would, otherwise, look discolored and unprofessional. To learn this secret trick used by the professionals, download this eDoc today.
Motivated Editing
Though it is the simplest way to transition from one shot to the next, making a natural-looking cut can be tricky. If you're not careful, you could end up with a series of jump cuts which can be jarring to the viewer. The best way to make an otherwise obvious cut is to make a motivated edit.
One way to achieve a motivated edit is to use the on-screen conversation to determine the timing of your cut, known as the “shot/reverse shot” technique. For example, when Subject A asks Subject B a question, cut to Subject B for the response. You can then cut back, again, to Subject A for the reaction to the absurdity of Subject B's response. Cutting in this fashion will allow the viewer to follow the conversation in a manner which feels natural.
By making motivated edits each shot will run smoothly into the next which will create a seemingly continuous flow of shots. Once you're able to master this technique, your edits will be flawless and your videos will begin to look more professional.
Avoiding Backlight Errors
Silhouettes are great for hiding a person's identity. However, when silhouetted figures mistakingly make their way into your family videos, professional productions and other projects it's often less than pleasing to the viewer. This lighting error is easy to avoid, yet happens much too frequently.
Silhouettes are caused when your key and fill light aren't strong enough (or are non-existent) to balance out the brightness of the backlight. Regardless of where you're shooting, whether it's indoors in front of a window or outdoors in front of a bright landscape, there are several ways you can avoid a silhouetted subject due to overpowering back light:
If you have the option, use the manual aperature setting on your camera. This allows you to be in control of what's going to be properly exposed, rather than your camera deciding for you.
Move your subject so that the bright background/primary light source isn't directly behind, but rather to the side of the subject or in front of them. You can use the natural light as a key or fill light.
Use a reflector to bounce the light coming from behind the subject back onto their face.
If you're using lights, bring the lights in closer to the subject in order to compensate for the brightness of a window or background. (However, be cautious when mixing lights of different color temperatures; it may result in lighting that looks unnatural).
Move the camera closer to the subject. This way your subject will fill more of the frame than the bright background, allowing you to get better exposure.
Being aware of your lighting options, no matter where you are, will allow you to address potential exposure problems before they occur. Knowing how to effectively work around these issues will allow you to create videos that are well-lit and free of silhouettes.
Creating unintended silhouettes is one of many problems that can be avoided by following commonly used lighting set-ups. In our new Video Lighting DVD, we make no assumptions about your previous knowledge or experience. Each segment walks you methodically step-by-step through the process to set up ideal lighting for a variety of situations.
Creating Titles for Video
A simple editing mistake many editing beginners make is when creating titles for their movie. Until you know the advanced titling techniques, the best bet is to stay simple. Here are a few tips to keep in mind when creating your titles:
Don't use a multitude of varied fonts, stick to one style. The objective is to present a polished presentation, not to try to show your viewers how many fonts, colors and weird wipes your editing system has.
Do use the "safe title area" grid to make sure your words don't fall of the screen. Every TV or monitor is just a bit different in size and resolution. If you have your titles too close to the edges, some of your viewers might not be able to see all the words them.
Don't use fancy lettering that is difficult to read. A "sans serif" style like Arial is best. Sans serif means it doesn't have the little "hooks" around the edges of the letters.
Do make your fonts large and bold.
Don't over-crowd your titles. Edit down some of the words or use extra pages.
Do give your viewer enough time to read the titles, but don't leave them up too long. A good rule of thumb is to leave them up long enough that you can read through each line on each page twice.
Don't use wild colors. A simple white or yellow font with a soft gray shadow is usually best.
Do pay attention to how the titles look over your video. They should have the opposite contrast of your video. If your scene is too bright or white, a darker font will show up better than white or pastels. Additionally, if you have a very dark scene, a light font shows up best.
We have placed all of these essential editing techniques on one convenient DVD so you can learn these techniques in the comfort of your own home. Even if you know nothing about video editing today you can order this 30 minute DVD and learn everything you need to know to edit your own videos using the basic tools that are included with most new personal computers and Macs.
Storyboarding with 3x5 Cards
You've completed production on your documentary, and now you're ready to start post production. The only problem is you've got so much footage and archival elements it's hard to keep everything straight, let alone organize it into a cohesive story. An easy way to sort through your thoughts is by using 3x5 cards to outline your story.
The first step to this process is to write each of the basic elements of your story on its own 3x5 card, including any photos or archival footage that you have acquired. Once you've completed this step, lay the individual pieces of your story (written on the 3x5 cards) out in front of you in a way that you imagine the story unfolding. If a story element doesn't seem to work, move it to another place, or pull it out completely.
By using 3x5 cards to outline your story, you're able to mix and match the individual pieces of the documentary's structure. This will help add to the creative process by breaking the confines of a word document outline. So, take a moment to step away from the computer and mix things up, you may be surprised at what you come up with.
Bouncing Light: Using Reflectors Outdoors
Lighting outdoors can be tricky at times, due to a lack of readily available electrical outlets. The sun works great as a natural light source, but sometimes the sun can create shadows that are too harsh. Putting your subject in the shade can alleviate the dark shadows that the sun creates, but can also lead to an image that is too dark or muddy. A great way to solve any of these outdoor lighting issues is by using reflectors.
Reflectors can be used as a key, a fill or a backlight. One way to use a reflector outdoors is to place your subject in front of the sun. Using a the sun as a back light will create a nice rim of light on your subject's head and shoulders. Then, to avoid a silhouetted appearance, use a reflector to catch the sun's light and bounce it back onto the front of your subject. The reflected light will help combat any shadows caused by the sun. This setup can also be used with two reflectors. Use one of the reflectors as a key light, and a less reflective one (i.e. a white board instead of a silver reflector) for the fill.
Another way to use a reflector outdoors is by placing your subject in the shade. The shade will act as a natural diffuser, eliminating the harshness of the sun's light. You can then use reflectors to bounce additional light onto your subject. This will help fill in shadows and separate your subject from the background.
The possibilities are practically endless when using reflectors outdoors. Well-placed reflectors can help you create a nicely lit scene while separating your subject from the background and adding depth to the overall shot.
Documentary Tip: Public Domain
In the field of documentary it's not uncommon to have to use copyrighted works such as photographs, music, historical footage and artwork. Copyright laws can spell serious problems for your documentary if not followed properly. Many amateur documentarians will simply turn a blind eye to copyright laws which results in legal consequences if they sell or show their documentary to anyone (this includes posting to YouTube and/or other video-sharing sites). Other documentarians will claim the copyrighted item falls under fair use. However, the fair use exception isn't always as black and white as one would hope. One way to avoid copyright legalities altogether is to use material that is in the public domain.
The public domain is a collection of work that isn't owned by anyone, therefore free to use by everyone and without requiring special permission. In the United States, there are many different factors that determine when a copyrighted work enters the public domain:
Anything published before 1923 is in the public domain.
If it was published between 1923 and 1963 without a copyright notice it is now in the public domain.
If it was published between 1923 and 1963 with a copyright notice, but the copyright was never renewed, it is in the public domain.
If the creator decides not to obtain copyright, but rather contribute a work specifically for the public domain.
Anything published before 1923 is safe to use, however, be careful that the work you are using is, indeed, the original work created before 1923. For example, the score to Tchaikovsky's Nutcracker Suite would be in the public domain. But, if you are using a modern recording of the song, it is considered a new work and, therefore, possibly protected under copyright.
By adhering to fair use and copyright laws you will be able to avoid legal catastrophes down the road. It may seem like a hassle to track down permission to use copyrighted material or to dig through public domain files in search of something usable, but the extra effort to obtain legal clearance will be well worth it in the end.
Editing Audio First
There is nothing more compelling than a great video matched with even better music. However, music tends to be an afterthought in the editing process, making that perfect audio/visual match near impossible to obtain. This is often because the rhythm of the music doesn't match the rhythm of the cuts.
A typical solution would be to compromise your initial vision for the piece and scour your music library for a song that does the job well enough. A better solution would be place your audio track in the timeline before you begin cutting your video. By viewing the audio waveform as you edit, you will have a clear-as-day blueprint for your cuts.
By cutting to your soundtrack, you are insuring both rhythms, audio and visual, are in perfect synchronization. This will not only make your videos look more professional, but they will be more compelling and emotionally charged.
Editing Tip: Using Shot Logs
Shot logs are a great tool to have when editing. A shot log is usually compiled during production and will provide you, the editor, with important information about each shot such as scene information, time code in and out points, and notes on the quality of the take. However, not all production teams feel the need for shot logs, or sometimes forget to fill them out. In the case of one-man bands, there just aren't enough hands to direct, operate the camera, monitor the audio, and jot down notes. This often results in the editor receiving a stack of tapes with no idea as to what is on them.
As an editor, you'll most likely want to dive into the project and immediately start cutting. Not having a shot log will slow down the editing process significantly since you will be forced to scrub through all the footage in search of usable shots. Since you're going to have to watch the footage anyway, you might as well be logging those shots. This will allow you to retrieve information necessary for batch capturing. You'll also become more familiar with the footage, which will help you make better editing choices.
If you do log your tapes, be sure to indicate on your shot logs the date and name found on the tape. You can then label your edit bins according to the tape they correspond to, creating a organized system that is easy to follow. With great organizational techniques and shot logs you'll always be able to locate those great shots with quickness and ease.
The Dramatic Arc
Though documentaries are following real-life events they still require the basic structures of storytelling: a beginning, middle and end, and should follow a dramatic arc. Using a dramatic arc as the framework of your documentary will help you add structure to your overall message.
So what is a dramatic arc? Imagine your story as an arc. Your story begins at the bottom of one side of the arc. This is the point at which you introduce the characters of your documentary. As the line builds upwards towards the peak, so should the conflict as you reveal more of the puzzle pieces. The peak of the arc is where the story climaxes and a turning point is reached. As the line arcs downwards towards the other side, your story moves towards it's resolution. Finally, when the line ends, your story concludes.
Placing the milestones and turning points of your documentary in the appropriate areas of the arc can help you construct your story in a manner that allows it to continuously move forward, all the while building towards a climax and reaching a conclusion. For this reason, adhering to the concept of the dramatic arc will allow you to create better documentaries that have more impact on the viewing audience.
Basics of Film Noir Lighting
Film noir is a style of filmmaking that became popular in the 1940s and 1950s. Its most notable style characteristic is a lighting design that is matched to the dark nature of the storyline and the sinister characters that the film follows. Film noir is known for its shadowy, high-contrast scenes consisting of deep shadows and intense highlights. In order to mimic this lighting style, one must first understand the basics of film noir lighting.
Think of film noir lighting as a magnifying glass. What do you want the audience to focus on? Use your light to carve through the shadows and illuminate the object of focus. You may rather choose to create a crisp shadow or silhouette, allowing that to be your focal point. Either way, to successfully light in this manner, an intense hard light is required for keeping your subject illuminated while the camera's iris is closed enough to allow for the dark shadows.
Remember, you're not lighting the whole scene, you're trying to pull things out of the shadows. Be sure to always light with precision and purpose. Shadowy faces, dark surroundings, and silhouettes are all acceptable, if not encouraged in film noir, so use them. Learning as much as you can about lighting in the film noir style, as well as any lighting set-up, will help you in your quest to capture the desired look and feel in your next production.
Editing Tip: Basic Compositing
Whether you're making a documentary and need to create lower-thirds, or making a movie and want to add some special effects, compositing video should be something every editor knows how to do. Lacking knowledge in this area will only inhibit you from reaching your editing potential.
Compositing video ranges from simple to complex techniques. The basic concept of compositing is as easy as layering two or more pictures to create one final picture. One way to do this is to start by placing at least two video clips in your timeline. Layer them on different video tracks, but with one directly above the other. By turning down the opacity, cropping, or keying out parts of the top video track, you'll be able to see the video track underneath it. When played, the remaining visible parts of the two videos will appear as one, resulting in a simple composite.
Knowing how to composite video allows you to create lower thirds for interview subjects, watermarks or bugs for company identification, and spooky ghost effects. Combine compositing with footage shot in front of a green screen and you can recreate the effects found in movies like Lord of the Rings, Star Wars, The Matrix, and Sin City. With a little practice and some imagination, there will be no limit to what you can do.
There are times, however, when learning advanced editing techniques on your own can be frustrating. During the learning process, it's not uncommon to come across problems that seem to have no solution. Not being able to find helpful resources only adds to the frustration, and pretty soon you're ready to give up.
Character Development
Every story needs a character. Good character development can help the viewer relate to your subject and the issues being presented in your documentary. The most important part of character development is to form an emotional connection between the viewer and your character.
By nature, people want to connect with others on some level or another. If you give the viewer a reason to empathize with your subject they'll want to stick around to see what happens to them. Establishing this connection should be done at the beginning of your documentary, as you introduce the character. Within a few scenes you should be able to show your character's personality traits, and gain the viewer's empathy.
Once the viewer cares what happens to your character, identify your character's motivation for the goal they are trying to reach. Show your audience the obstacles that the character must overcome to reach those goals, and any barriers that may hold them back. This can help build conflict and shape the development of your character as they struggle in their journey. Interviewing your subject is helpful as well, because it allows your subject to voice their thoughts and emotions.
In the end, it doesn't matter if your character is successful at reaching their goal or not. If you create an emotional connection between the viewer and the character, the viewer will be able to empathize with the character no matter the outcome. The character is a very powerful tool in the documentary genre. If you are successful in the development of your subject, you will be able to create a more compelling story, and add to the overall emotional impact of your documentary.
Editing Tip: Polishing Your Work
It's easy to spot an amateur video. They're usually the videos that are full of problems, such as mismatched audio levels, footage that is in need of color correction, or a story that is bogged-down with unnecessary scenes. There's an easy way to avoid being categorized with the amateurs: never send out work that hasn't been polished.
Once you've edited to your heart’s content, you should do one last final edit. Start by going through your video and take out any unnecessary shots. It's easy to get attached to a beautiful shot, but if it's not moving the story forward, it's not needed. If you're having trouble deciding whether something works, don't be afraid to get a second opinion. Once you've cut out all of the unnecessary footage, tweaked your rhythm, perfected your transitions, and ensured you are within the total running time specifications (if applicable), you're ready for color correction and audio sweetening.
Polishing your work will take a good amount of time to complete. However, in the end, it will be time well spent. Not only does the polish edit make your final picture look more professional, but it can also turn a lackluster video into gold.
Planning, Plotting, Lighting
There's no doubt that production planning can save you loads of time. As videographers, we plan ahead for shooting on location and camera moves, but often overlook plans for lighting. Light planning is important to the overall success of the production. Without proper light planning you could end up not having enough lights or the proper lights. You could have too many lights or waste valuable time on set deciding from which angle you should light your subject. One way to avoid these potential problems is by creating a lighting layout.
A lighting layout allows you to visualize the set prior to beginning production. Make a sketch of the set, adding the desired location of your camera and talent. Once that is done, you can work in your lights. By planning your light positions ahead of time, you will have an easy-to-follow blueprint of where each light source should be located for each scene, making set up a snap. A light plot will also help you keep track of how many lights are needed, how much wattage you will be using in each setup (which can help prevent accidentally overloading circuits), and can assist in catching potential problems before they happen.
Remember, thorough production planning allows you to foresee problems that may arise during production, gather the required equipment, and plan the details out ahead of time. Addressing these factors during pre-production will allow you to focus on the task at hand when it comes time to switch on those lights.
Lighting for Smoother Skin
The intense brightness of production lighting can be unforgiving in the way that it puts your subject's skin out on display. Production lighting can act like a bright beacon calling attention to any, and every, flaw on the face. However, by learning how to properly light your subject's skin, you can soften the appearance of blemishes and skin flaws.
Larger light sources throw a softer light than smaller sources. For this reason, they are better suited for lighting skin in a flattering manner. Some larger light sources include softboxes and umbrellas. Bouncing a harsh light off of a surface, like a wall or white board, can help diffuse the intensity as well.
Keep in mind placement. The further you place your light to the left or right side of your subject the more shadows your subject's face will have. This will emphasize any blemishes they may have. By placing your large, diffused light source slightly above, and just to the left or right of the camera you'll create a softer, more even distribution across the subject's face.
No one wants their 15 minutes of fame to be shadowed by an attention-seeking blemish. There are many ways to improve the quality of skin texture in video, and knowing how to light your subject to get the best results can create a better looking image and help put your subject at ease.
For more tips on lighting that compliments the skin, as well as other skin smoothing techniques check out Take 5: Five Steps to Smoother Skin.
Night Lighting: Location Considerations
Studio lighting is pretty straightforward: you have your lights, your lights have electrical outlets, your electrical outlets have electricity, and everyone is happy and well-lit. However, not all projects are going to allow you to shoot video in a controlled environment. What happens when you have to shoot outside...at night? What if there isn't anywhere to plug in your lights?
Shooting outdoors at night can be difficult. However, with the right choices you can avoid underexposed footage. One way to do this is thorough location scouting. Location scouting for an outdoor night scene is somewhat different than location scouting for a daytime or indoor scene. Here are a few things to keep in mind when looking for a place to shoot.
Check for any electrical outlets that you might be able to use. A single outlet can mean the difference between using lights or searching for another alternative.
Try to find a location that has plenty of ambient light, such as street lamps. This will help keep your background light levels up, diminishing the harsh contrast between your subject and the background.
Check for ANY source of light that you may be able to use, such as shop windows, car headlights, and the forementioned, street lamps. All of these sources can be coupled with a reflector to help light your scene.
No matter your location, avoid using video gain to increase your camera's ability to see the image. Increasing your exposure with video gain will make your images grainy while diminishing the color saturation.
With adequate planning and thorough location scouting, any outdoor production can be successful, even at night. Knowing the various tricks you can use to get the most out of the light you have will allow you to capture a usable image everytime.
Once you know the basic thoeory and verious tricks, you can walk into any room and quickly identify what needs to be done to create the ideal lighting set up for your video. Videomaker's Light It Right DVD teaches you how to look around and think like a video lighting professional.
Lighting Design: Making Cookies
Whether you are lighting an interview or a scene from a movie, the background light must always be considered. How much light should you use? How many shadows need to be created? Should you apply a simple splash of color or something with more texture? When making these decisions it's handy to have a variety of cookies to choose from.
A cookie, short for "cucalorus," is a large board with a pattern or shape cut out of it. It is placed in front of a spot light in order to throw a textured shadow or a silhouette onto the background. These shadows and silhouettes can include tree branches, blinds, or something a little more abstract. Cookies can bring additional ambiance to your scene and are not only easy to use, but also fairly easy to make.
To make your own cookie all you need is a large board, at least 24" square and preferably 1/2-inch foam core board, though thin plywood, sheet metal or cardboard would work also. To help control the bounce from the light source choose a board that is black on both sides. Next, use a sharp edge, such as an Xacto knife or box cutter, to cut out the pattern of your choice. Drawing your pattern on the board prior to cutting may help as a guide. Remember, if your desired effect is a silhouette, cut out the area around the shape, not the shape itself.
Cookies are a basic lighting accessory that will allow you to vary your lighting design. By learning how to make your own cookies you can create endless design possiblities while being able to be more adventurous with your choices.
Lighting Multiple Subjects
Three point lighting works great for interviewing individual subjects. However, there will be times when you will light a multicam shoot with both the interviewer and the interviewee in the shot. Lighting both subjects with a standard three point lighting set up may leave you with misdirected lighting and shadows in places you don't want them.
So how does a person light for subjects in a multiple camera interview shoot? The basic rules are the same when it comes to lighting any subject; good exposure and depth are vital. For this reason, always consider lighting the interview subject with a key, fill and back light for the best results. Let's go through the steps of lighting a two person/multicam interview.
First, light both of your subjects with their own key light. Placed 45-degrees from the main camera, each key light will sit opposite of the subject it is lighting. Next, place a back light for each subject between the subject and the background. Again, each light will sit opposite to the subject it is lighting. Both the key and the back light should provide enough spill to light each subject with enough fill light. It also helps to have a background that is light in color, since it will bounce the light back onto your subjects, separating them from the background.
Once your lights are set up, make some final adjustments to the height and placement, in order to cut back on the amount of shadows cast. Barndoors can help direct the light, while keeping it from spilling into areas you don't want it. And mounting your lights on C-stand arms can help extend their reach, while keeping the stand out of the camera's view.
Remember, when lighting for interviews, get good exposure with a key light, fill any shadows with the fill light, and separate your subject from the background with a back light. Follow these simple rules and you'll be on your way to lighting interviews like a pro, no matter how many people you're lighting.
Truly great video is a sum of its parts, so mastering lighting isn't enough. Sloppy execution of even one element of your production can result in video that is unappealing and amateurish. Develop an eye for details and the skills to master them. Videomaker Magazine gives you the knowledge required to become an expert in all the key areas of video production.
Editing Tip: Editing a Fight Scene
Everyone loves a good fight scene. Whether the fight takes place in a boxing ring, dark alley, or grocery store, the editing techniques for a fight scene remain the same. As an editor, the question you need to ask yourself is, "what kind of fight scene am I trying to portray?" Do you want to add drama to your scene or an element of chaos, or both?
Using multiple quick cuts within an action creates a fight scene that is fast-paced, while emphasizing the struggle between dueling parties. Cutting to the beat of a rowdy song will also add a chaotic element to any fight scene.
If it's drama you want, try adding slow motion into the mix. Using slow motion allows the viewer to see elements of the fight that would otherwise go unnoticed. Reserve the use of slow motion for an action within the scene that you would like to add emphasis to, such as the dramatic impact of a punch or kick.
Action-enhancing editing will allow you to create a fight scene that is believable and packs a whole lot of punch. Take the time to learn and practice the techniques on our Videomaker Action DVD and you will be on your way to creating action sequences that will have your viewers on the edge of their seats. To find out more about the techniques you can use to add suspense to your video, see the Videomaker Action DVD.
Hand Held Camera Techniques
There is no doubt that a tripod lends itself to steady camera shots, as well as smooth pans and tilts. However, when you're shooting a "run and gun" documentary, a tripod can become too cumbersome to lug around. Sometimes, a tripod isn't needed when attempting a more stylistic hand held approach. Either way, without a tripod, your camera work is more likely to suffer from the shakes. To reduce the amount of excessive movement in your video try practicing the following hand held camera techniques.
Keep your elbows bent and tucked near your body. Use one hand to hold the camera, and the other hand to support your camera hand, or to give additional support to the camera.
Keep a wide stance and don't lock your knees. By keeping your knees slightly bent you're allowing your body to act as a shock absorber, and the wide stance will give you better balance.
Keep your lens wide and don't zoom in. Wider shots will make your video look less shaky, but if you zoom in you significantly increase the chances of a shaky shot. If you must get closer, physically move the camera closer.
If you need additional support, try using the hood of a car or a park bench. Essentially, anything around you can be used to help in stabilizing your camera.
Hand held camera techniques can help create a more subjective feel to your documentary if executed properly. The secret to great hand held video is practice, practice, practice. And within no time, you'll be able to leave that bulky tripod at home.
Avoiding Green Screen Blunders
When it comes to green screens, lighting can be tricky. There are many factors that must be addressed in order to get results that are not only effective, but believable. Properly lighting your green screen is a good place to start, and lighting your subject in a manner that sells the effect will also help. However, where you place your subject in relation to the green screen will determine the ease in which you can key the background in post production.
The problem with light is that it wants to go everywhere, and where it can't go it will certainly leave a shadow. This becomes a problem when attempting to light a green screen. If your subject's key light throws a shadow on the background, it will be harder to key out during post production. If the green screen reflects onto your subject, your subject will be bathed in a greenish hue, which will obliterate any chance of the effect looking real.
There is a simple way to solve both of these green screen lighting blunders: pull your subject further away from the green screen. By increasing the distance between the subject and the background you'll be able to avoid shadows cast by your subject. Increasing the distance between your subject and the green screen will also decrease the possibility of light reflecting off of the green screen and onto your subject. Additionally, it's a good idea to keep the green screen limited to one wall of your studio. Outfitting an entire studio in a green screen chroma may seem like a good idea, but it will lead to a higher risk of spill since the light will be reflecting off of each surface.
Understanding how light behaves will help you get around problems it can cause. Reducing the amount of blunders in your green screen lighting will ultimately save you time and energy during post production while allowing you to create believable green screen effects.
Good videographers seek out projects that challenge them, taking them out of their comfort zone and requiring them to hone new skills and refine old ones.